


Natural Clays are packed with minerals, make excellent natural colourants in soap, and help detox the skin.
Purple Brazilian Clay is a pastel pinky-purple colour when dry, and almost chocolate-purple when wet, and is the only colourant used in this project. It contrasts beautifully with the white Shea Butter Melt and Pour Soap which we have teamed with our Sage and Lemongrass Fragrance Oil, which is light and refreshing.
This is a simple layered Melt and Pour Soap, decorated with drizzled liquid soap and can be cut into as many bars as you like.
You'll need:
- 700g Shea Butter Natural Melt and Pour Soap Base
- 50g extra Shea Butter Natural Melt and Pour Soap Base
- 150g Clear Natural Melt and Pour Soap Base (any of the clear varieties are fine)
- 2 - 3 teaspoons of Purple Brazilian Clay
- 10 - 15g/ml Sodium Lactate Plus (to hydrate the Clay)
- 30g Sage & Lemongrass Fragrance
- Small Slab Flexible Mould
- Pipette (to decorate the top)
- Alcohol and Sprizer Bottle - Necessary for layering
- 2 x Microwave jugs, spoons, stirrer's and your usual equipment

Method:
-
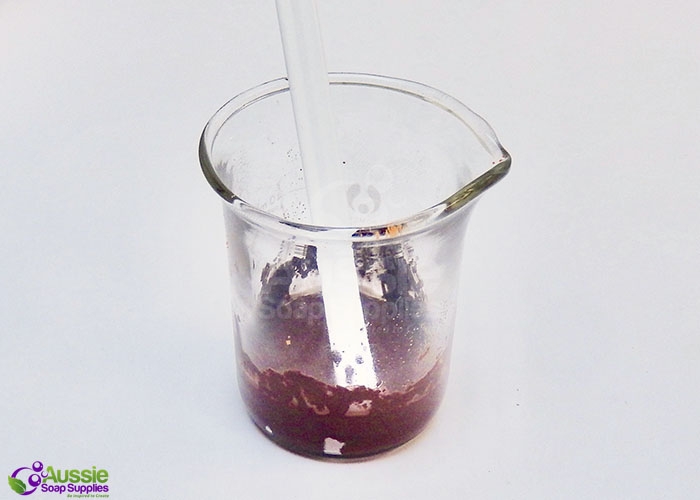
Measure out the Sodium Lactate Plus into a small beaker and add the clay. Use a mini mixer or stirrer to mix until all the lumps have been removed and the mixture is a smooth slurry. If there are obstinant dry spots use a quick spritz with Isopropyl Alcohol to disperse these
- Set this aside

- Weigh the Shea Butter Soap Base into two portions of 350g each. Dice each portion of soap into small chunks, and place the first 350g in a heat proof jug, and place in the microwave. Cover and melt on medium/low in 30 second bursts until liquid. Keep the temperature to around 60 - 65°C once melted
Add 7 - 10ml/g of Sage and Lemongrass Fragrance into the melted soap and stir to combine, and then pour this into the mould. Spritz with alcohol to remove any surface bubbles

- Gently warm the beaker containing the clay mixture (ensure that the container you are using can be heated alternatively you can warm the Sodium Lactate first). You are warming this so that when you mix it into the melted clear soap it doesn't form a big clump as the cold clay mixture hits the hot liquid soap.
- Whilst the base layer is setting up, prepare the middle layer. This layer has 50g of Shea Soap Base, and 150g Clear Soap Base - this gives a transluscent base to work with the clay. Dice them both and place in a smaller microwave safe jug and melt on medium/low in 30 second bursts. Keep the temperature to around 60 - 65°C

- Once melted, add the warm clay mixture, 5ml/g Sage & Lemongrass Fragrance and stir well to combine, spritz out any surface bubbles.
- Spritz the surface of the soap in the mould, which has now set up, and carefully pour the coloured clay layer over the surface and then spritz with alcohol to remove any bubbles. Note: You need to leave approximately a teaspoon of soap in the jug for the drizzle finish.

- Repeat with the other 375g of Shea Soap Base and fragrance, spray the clay layer surface and then pour the 3rd layer and spray to remove bubbles.
- Once this is set up it's time to drizzle the clay soap over the surface. Gently remelt that remaining soap (approximately 10g) clay coloured soap and give it a SHORT time in the microwave - take care it boils very quickly. Try 10 - 20 seconds on medium-low to avoid it boiling

- Snip the nozzle off the pipette to make a wider opening.
- Spritz the top of the soap slab with alcohol to ensure the drizzled soap sticks.
- Squeeze up a good amount of liquid clay soap into the pipette, and working smoothly and quickly, decorate the top of the soap. You will achieve a nicer finish if you work freely with a flowing motion. I have used a cross-hatch pattern for this soap.
- Leave for several hours to set up and when completely cold cut into six soaps.
- Wrap to store.
x
x
x
x
| Difficulty: | Beginner |
| Yields: | 6 - 10 bars |
| Time: | 1 hour |
| sale: | No |
| save: | No |


