

These products have been deleted by the manufacturer, so this tutorial is here for the use of those who have already purchased these products.
Our 3D Designer Soap Moulds are used to create professional, double-sided, Melt & Pour Glycerin Soaps, and Cold Processed Soaps. These strong and durable Moulds are manufactured from 1.5 mm thick, heavy duty ABS plastic, which is food safe and FDA approved. The ABS moulds can withstand casting temperatures of up to 80°C, and have excellent chemical resistance.
Using 3D Designer Soap Moulds
What You'll Need:

2 Part 3D Soap Mould and 2 Heavy Duty Elastic Bands
Soap Base - either part of your CP Batch, or Melt & Pour Base
Fragrance and/or Essential Oils
Suitable Colourants
Pyrex Measuring Cup or Sturdy Plastic Jug
Small Knife
Pour Your Soap
Melt and Pour Soap - After melting your MP Soap Base, add any fragrance and colourant desired, and then ensure that it isn't over 60°C. Pour the soap slowly and steadily into the mould. Give a slight tap on the bench to allow any any bubbles to rise.
Cold Process Soap- After preparing your CP Soap, pour the soap at a light trace, slowly and steadily into the mould through the funnel. If using a fragrance that will accelerate trace, pour quickly and then give a light tap to remove any air bubbles.
Tips:
Overfill the mould cavity by pouring an excess into the funnel. This will act as a reserve and eliminate any large air pockets from forming at the top of the bar
Lightly tap the mould onto the table to release any trapped air, and if necessary, refill the funnel reserve. Unmould & Trim Your Soap
When the soap is ready to release, gently separate the two halves, until one side separates from the other. To release the soap from the remaining half, lightly and steadily twist the mould (ice tray style).
To trim your soap, score the cast on both sides with a small knife, where the funnel meets the bar. Then bend the funnel excess, back and forth until it breaks away from the bar. Lastly, trim the excess material or "flashing" from the bar.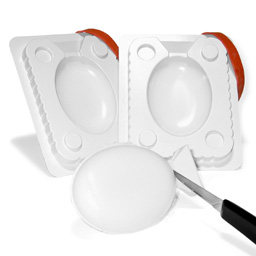
Unmoulding Melt and Pour Soap: Most MP soap can be unmoulded from our two-part moulds in 4 hours at room temperature. To expedite the unmoulding time, after the soap solidifies, chill it within the mould by placing it into the freezer for 15 minutes, or into the refrigerator for 1 hour. This will make the soap much easier to unmould, and in a fraction of the time at room temperature.
Unmoulding Cold Process Soap: It is recommended to let the soap set in the moulds for as long as necessary, usually 18 - 24 hours, until the soap has sufficiently solidified. If using a lot of soft oils this may take longer. If required you can "freeze" the cold process bars - it doesn't hurt them at all! Just remember to allow the mould to return to room temperature before exerting any pressure to pull the halves apart.
Cleaning Your 3D Moulds: To clean the 3D moulds, you can wash them in warm soapy water, or even leave them to soak and the just need a quick rinse.
Please note: Although able to withstand high temperatures, some moulds can warp in the Dishwasher, so it is safest to wash the moulds in the sink in warm soapy water.
Making Soap on a Rope Tutorial
In this tutorial you will learn how easy and fun it is to make your own professional Melt and Pour Soap and Cold Process Soap on a Rope, using our two-part 3D moulds and Soap Ropes which are just perfect for this process.
Soap on a Rope fits conveniently around Shower Rose or handles. It's also a great product for anyone with mobility problems, as you can hang the soap over your arm while you bathe or shower. Soap dries faster, and lasts longer. These make fabulous, professional looking gifts too.
What Youll Need:
2 Part 3D Soap Mould and Heavy Duty Elastic Bands
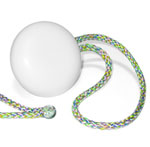
1 Soap Rope
Soap Base either part of your Cold Process Batch, or Melt & Pour Base
Fragrance and/or Essential Oils
Suitable Colourants
Pyrex Measuring Jug or Heat Proof Plastic Jug
Small Knife
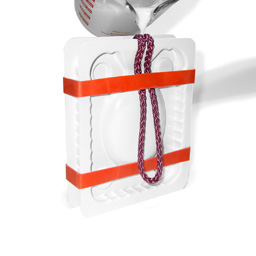
Measure Your Rope
Measure the length of rope necessary to embed the rope half-way into the bar, to the top of the funnel. The plastic "seal" at the base is easy to drop down the centre funnel and position.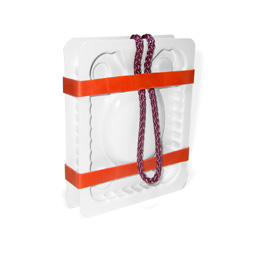
Prepare Your Mould
Lower the heat sealed end of the rope into the mould cavity, through the funnel, and tuck the remaining rope under the top rubber band.
Centre the rope in the funnel (left to right), and make sure that the rope is hanging straight into the mould cavity.
Pour Your Soap
Melt and Pour Soap - After melting your soap base, add any fragrance and colourant desired, and then ensure that it isnt over 60°C. Pour the soap slowly and steadily into the mould.
Cold Process Soap - After preparing your CP soap, pour the soap at a light trace, slowly and steadily into the mould.
Tips:
Overfill the mould cavity by pouring an excess into the funnel. This will act as a reserve and eliminate any large air pockets from forming at the top of the bar.
Lightly tap the mould onto the table to release any trapped air, and if necessary, refill the funnel reserve.
When making Cold Process you will need a Kebab Stick or Skewer to poke the rope into the traced soap
Unmoulding MP Soap: Most Melt and Pour Soap can be unmoulded from our two-part molds in 4 hours at room temperature. To expedite the unmoulding time, after the soap solidifies, chill it within the mould by placing it into the freezer for 15 minutes, or into the refrigerator for 1 hour. This will make the soap much easier to unmold, and in a fraction of the time at room temperature
Unmolding Cold Process Soap: It is recommended to let the soap set in the moulds for as long as necessary, usually 18 - 24 hours, until the soap has sufficiently solidified. If using a lot of soft oils this may take longer. If required you can "freeze" the cold process bars - it doesn't hurt them at all! Just remember to allow the mould to return to room temperature before exerting any pressure to pull the halves apart.
Finishing Your Soap on a Rope
Unmould the soap when it is ready, and trim away any excess material or "flashing" from the bar, and around the rope.
Don't forget to wrap Melt and Pour Soap Bars, or let them "sweat it out" and wipe clean.
Cleaning Your 3D Moulds: To clean the 3D moulds, you can wash them in warm soapy water, or even leave them to soak and the just need a quick rinse.
Please note: Although able to withstand high temperatures, some moulds can warp in the Dishwasher, so it is safest to wash the moulds in the sink in warm soapy water.
See our Selection of Braided Soap Ropes
See our Selection of 3D Soap Moulds
")


")
")