

Handmade Natural Cold Process Soap is often mistakenly called "cold pressed soap", so if that's what you think you are going to make, it's the same thing :). Just to clarify, the oils are "cold pressed" but the soap is "cold processed".
When you start Cold Process Soapmaking it can be a little daunting, it was for us, and that was in 1991, and we've never used any other soap since!
You will be using sodium hydroxide (also called NaOH, lye or caustic soda) and there several things to be aware of, and it's best to keep focussed. Take the phone off the hook, kids to school (or in bed) and animals safely out of the way.
We hope this photo tutorial will help with your first batch. We also strongly recommend watching Soap Queen's Video Tutorials here
You will probably find that you already have most of the equipment required, patiently waiting to be used to make your first batch of soap! This basic tutorial shows you the steps required to achieve your first batch.
We suggest you read this tutorial completely through a couple of times before you begin so you know exactly what to expect!
What is soap? As far as we are concerned soap is magic! It is intriguing, fascinating, can be frustrating, and always interesting! The chemistry involved in this process is:
An alkali plus an acid, together with water as the catalyst, creates the manufacture of a salt and glycerine. That is soap, pure and simple.
When the alkali (Sodium Hydroxide) is combined with the liquid (Distilled Water) and added to the fatty acid/s (Olive Oil, Rice Bran Oil,Coconut Oil etc), a reaction called saponification occurs creating a new product that is soap.
Soap is made with but does not contain sodium hydroxide (lye) in the finished bars.
This is fact, this soap can be described in several ways, but all natural, cold processed soap is made with a strong alkali, Sodium Hydroxide for bar soaps, and natural liquid soap is made using Potassium Hydroxide.
From now on, we'll refer to sodium hydroxide as "lye".
SAFETY PRECAUTIONS ARE ESSENTIAL - here's the mandatory list!

- Always wear protective gloves when handling Lye, mixing ingredients, and taking fresh soap out of the moulds
- Be aware that you are using Lye which is corrosive, and burns or poisoning are risk factors you must be mindful of
- Always store Lye high up, clearly marked and sealed tight
- Be aware of your surrounding work areas and keep these areas clear of clutter to avoid mishaps
- Don't allow children or pets in the immediate area
- Don't allow yourself to get distracted and leave lye water unattended
- Be aware of the environmental hazards and dispose of unsaponified ingredients safely
- When cleaning the soap pot, let the mixture harden (set up), then scrape remains into a plastic bag, which should be tied up and put out with the rubbish
- If washing immediately, add vinegar to the hot water and wash utensils as normal wearing gloves with washing up liquid/detergent
NEVER ADD WATER TO LYE - ALWAYS add the lye to the water
When you mix Lye and water together, the reaction between them generates a great deal of heat - this heat will break a glass jug or crack a brittle (non pliable) plastic jug.
For personal safety, wear protective gloves and goggles
Never breathe the fumes and always mix your solution outside or in a well-ventilated area
Be Prepared In Case of An Accident
ALWAYS keep water handy
If you splash lye water or raw soap into your eyes: Do not rub your eyes, instead rinse with cold running water thoroughly and attend an Accident & Emergency Department immediately
If splashes of lye water or raw soap occur on your skin: Immediately flush/wash affected area with water to rinse away the raw soap. When cleaning up, any splashes can be quickly neutralised by the vinegar; lemon juice works too, and in an emergency, even lemonade - all contain an acid, vinegar (acetic acid) and lemon (citric acid), which helps to neutralise the alkaline action of the lye. Previous medical advice was to neutralise the splashes on the skin with vinegar, however now the best advice is to flush with water for 15 minutes.
I treat sodium hydroxide like a snake, I treat it with caution, care and respect, and we've never had a disagreement!
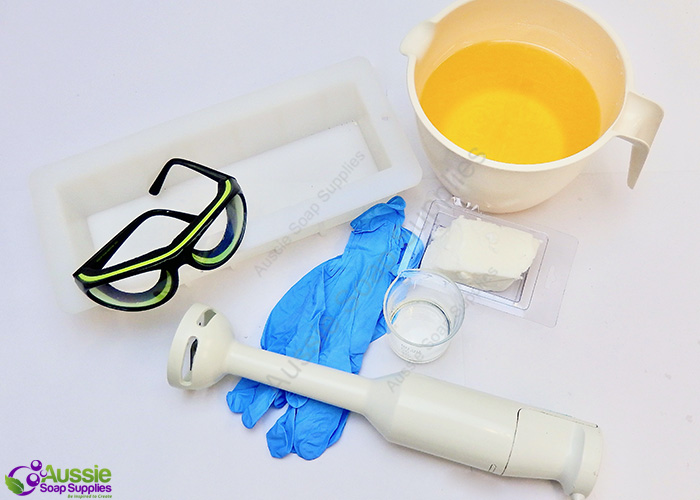
Equipment required:
- Stainless steel stock pot or heavy duty plastic bucket - for melting oils
- Sturdy, heavy duty plastic bucket - to mix lye and distilled water
- Stick blender (wand type) with stainless steel shaft - available at all large chain stores
- Measuring jugs - I like heat tolerant plastic, but you can use Pyrex too
- Accurate scales - preferably digital - available at all large chain stores
- Spatulas and sturdy spoons - not wooden
- Paper towels
- Soap moulds or milk cartons (use the fresh chilled milk type cartons - avoid the long life milk cartons)
- Stainless Steel Thermometer - not absolutely necessary, but very useful
- Rubber gloves and eye protection
- Running water or bucket of water nearby in case of spills on skin - to rinse away raw soap
Beginners Basic Soapmaking Recipe
This recipe will make a good hard Soap with plenty of lather and it contains 44% Olive Oil.
Ingredients:
300g Coconut Oil
400g Olive Oil
200g Sustainable Palm Oil
130g Sodium Hydroxide (Lye)
330g Distilled Water
30g/ml (5 - 6 Teaspoons) Essential Oils or Fragrance
*You require 98% sodium hydroxide purity. Check the label carefully if purchasing elsewhere.
HOW TO MAKE IT HAPPEN
Set out equipment and ingredients. If you are prepared you are more likely to feel confident!
Carefully measure out all the ingredients and set aside.
Use a sturdy plastic bucket for the distilled water, and a separate one for the lye. DO NOT USE GLASS or ALUMINIUM.
Ensure that you measure essential oils and fragrance into a GLASS vessel such as a beaker, not a plastic cup.
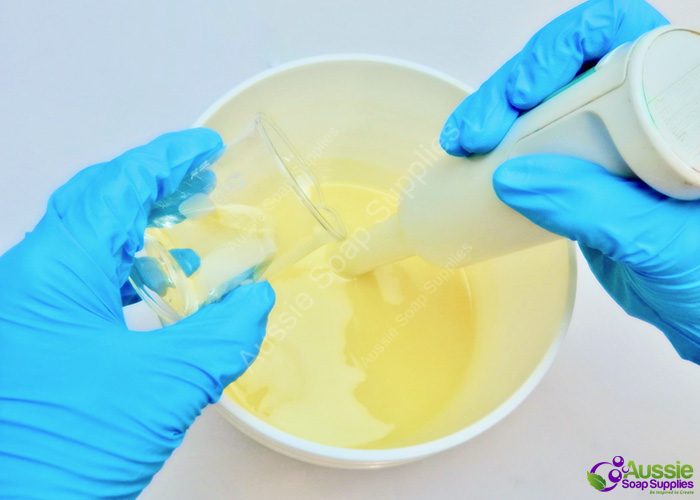
Take the distilled water, a sturdy spatula or spoon, and the lye outside, or to a very well ventilated area and add the lye to the water. It is REALLY IMPORTANT to do it this way - don't add the water to the lye granules as it is dangerous if you do it that way. This mixture gets really HOT, so please take care and wear gloves and eye protection. Stir until the lye has dissolved - AVOID INHALING THE FUMES. Allow mixture to cool (safely away from pets and small children). When this mixture cools, there will be no odour or fumes.
Whilst the lye water cools, combine all the fixed oils (olive, coconut etc) and gently heat until all oils are liquid and approximately 40°C, or a little below. If you have no thermometer, baby bottle or blood temperature is good!
When the lye water has cooled to a similar temperature (approximately 40°C), you are ready to proceed.

Pour the lye water into the melted oils. Its a good idea to have your eye protection on at this point as it can splash back.
Immerse the stick blender into the pot, well below the surface, tap it to release any air, and give it some blasts with the blender.
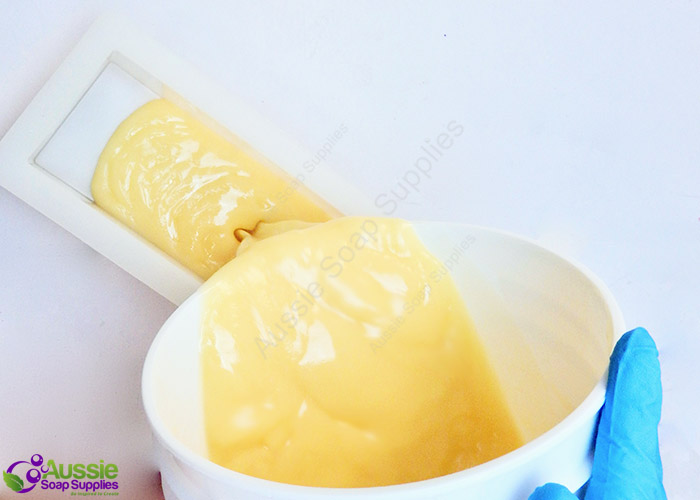
You will see the mixture immediately appears milky looking, but still oily.
Your goal is to make an homogenous mixture which looks like condensed milk.


This is trace!
You are now ready to add the colour (if using) and fragrance.
If using colour, you add this now (this batch is uncoloured so you have less to worry about).
If you decide to colour this batch, mix through with a couple of blasts of the stick blender, taking care not to over trace the soap.
You want to avoid a thick pudding-like consistency at this stage.
Now add the fragrance or essential oils - around 2.5 - 3% of the OIL weight will ensure you have a safe and fragrant soap after it has cured.
Stir through in short bursts, or stir manually, with a whisk so that the trace is not too thick.
Don't forget you can blend essential oils and fragrant oils together to achieve a more economical batch of soap.
(Fragrances such as Rose and Sandalwood are very expensive, so by blending fragrance oils with the essential oils you can have the best of both worlds.)
When the fragrance and essential oils hit the warm soap batter there is a burst of scent released into the air,
a little like in a room diffuser when you first add the oils, so take care not to inhale the fumes, especially strong essential oils such as peppermint and rosemary,
because they can be quite overpowering and you may get a headache. When your soap has cured, the strength will be just right!

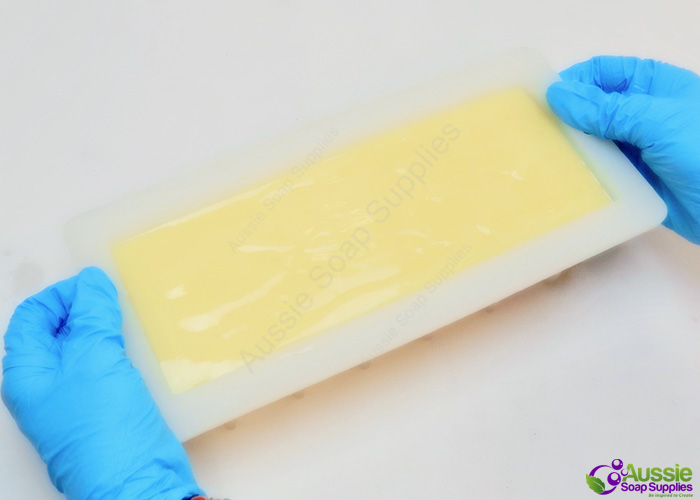
The soap ready to pour into the mould now.
This is heavy trace!
Tap the mould on the bench to ensure there are no air pockets.
Cover and insulate to encourage the soap to gel.
This is when saponification begins, and it does this all on its own!
Unmould the soap after approximately 2 - 5 days and cut with a soap cutter blade or knife.
The soap takes a couple of weeks to cure, and then a further four weeks or so drying out time before it is ready to use.
Allow the soap to cure for a minimum of 6 weeks.
This not only allows the completion of saponification, but also allows the water content to evaporate, or dry out.
The longer the cure period, the harder the bars will be.
| Difficulty: | Beginner |
| Time: | 1 - 2 hours |
| save: | No |
| sale: | No |


